Bulk Create/Update Work Items
The Bulk Create/Update Work Items tool is particularly useful when transferring batches of new or updated Work Items into the myData system, or uploading defect data collected in the field using a mobile device.
Click on this link under the Tools menu will activate the Bulk Create/Update Work Items wizard that will guide you through the process - follow the prompts and click the Next button to proceed through each step.
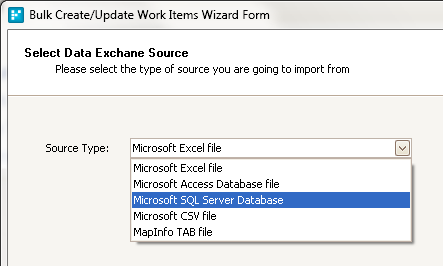
Step 1 - Select Data Exchange Source
- For your convenience, five different file types are supported:
- Microsoft Excel (.xls)
- Microsoft Access Database (.mdb)
- Microsoft SQL Server Database
- Microsoft CSV (.csv)
- MapInfo TAB (.tab)
Bulk Create/Update Work Items wizard - Select Data Exchange Source
- Select the file type you wish to import from in the drop-down list and go to Next.
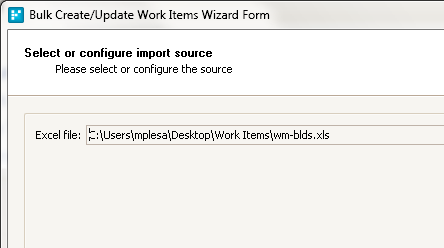
Step 2 - Select or Configure Import Source
- Navigate to the file you wish to import to.
The navigation pane can be activated by hitting the ellipsis button (.XLS files) or selecting the Add button (for .CSV and .TAB files). - When working with databases, you will need to add in the relevant server and authentication details to gain access.
Proceed to Next.
Bulk Create/Update Work Items wizard - Select or Configure Import Source
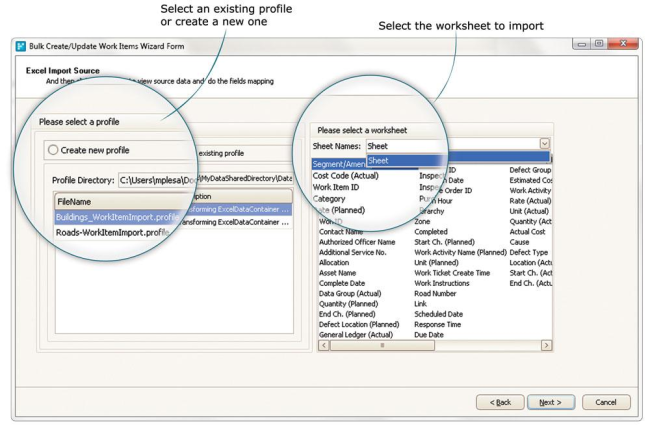
Step 3 - Import Source
In this step, you will be prompted to select a profile.
A profile can record the field mappings for files that are regularly imported, which can save a considerable amount of time.
If this is the first time importing work items for this type of file, choose the Create New Profile option.
To retrieve an existing profile, activate the Use Existing Profile radio button and select the desired profile from the list provided.
You must then select the name of the worksheet you wish to import from the Sheet Name drop-down box (Excel imports only).
Click 'Next'.
Bulk Create/Update Work Items wizard - Import Source (Profiles)
Step 4 - Fields Mapping
This window displays the Work Item fields that exist within myData, as well as a preview of the fields that exist within the import file.
Using each of the drop-down arrows next to the myData field listings, select the corresponding source data field.
Blanks are acceptable as some fields, like those with time stamps and ID numbers, are automatically generated for new entries.
There may also be certain fields that are not required by myData and vice versa.
Work through the list until you believe you have matched up all the fields you would like to bring into the system.
Check for business rules during import SMP matrix of decisions during bulk import.

Bulk Create/Update Work Items wizard - Fields Mapping page
Please note that the Asset ID and Asset Category fields must be mapped as this is essential to creating the link between the asset and the work item.
Select Next.
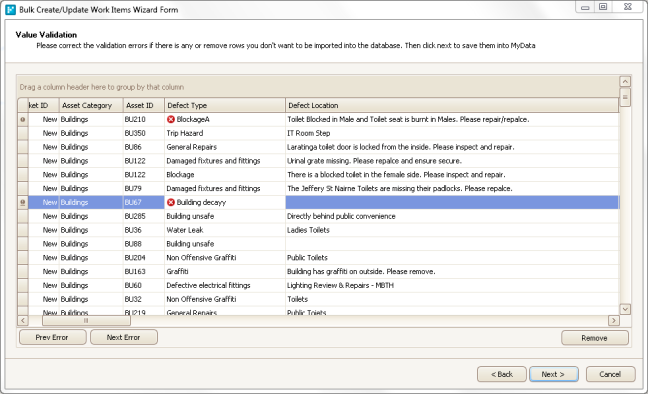
Step 5 - Value Validation
The next step will check that the data to be imported is valid.
If there are any validity issues, these will show up as errors that may be fixed in the resulting window by typing directly into the affected cell.
Use the Prev Error and Next Error buttons to scroll through any broadcasted errors.
Whole records may also be removed from the import list by highlighting them and selecting Remove.
Alternatively, if there are a large number of consistent errors.
It may be more time efficient to return to your source data, apply any data amendments to the entire file, then attempt to import it again with the changes made.
Bulk Create/Update Work Items wizard - Value Validation
Once the data is error free hit Next to start the import process.
A dialog box will appear to confirm your intention to import.
Choose OK to proceed or Cancel to go back if further amendments are required.
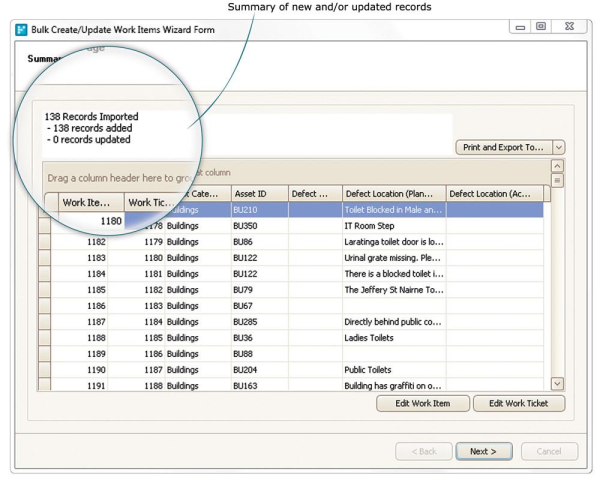
Step 6 - Summary Page
This page will display the number of records imported, while also breaking this number down into new records and updated records.
Check these numbers to confirm that the import was successful.
If required, you may make individual changes to work tickets or work items directly from this window by choosing either the Edit Work Item or Edit Work Ticket button.
The Print and Export button also gives you the option to print or export the imported data to a number of different file formats.
Proceed to Next.
Bulk Create/Update Work Items wizard - Summary Page
Step 7 - Completing the Wizard
Upon completion of the Bulk Update/Create Work Items wizard, you will be presented with the option to save the field mappings used for the most recent import.
If you plan to import similar data again, it is recommended that you save the mappings to better manage time in future.
This data is stored in a profile and can be selected at the beginning of the wizard if required for future imports.

Bulk Create/Update Work Items Wizard - Saving Field Mappings
To save the mappings, go to click here and assign the profile to a file name and description.
Click 'Finish' to exit the wizard.
